Roasted Lemon Herb Chicken Recipe

The two most popular dinner requests in my household are for chili and roast chicken. They are both classic comfort foods and my husband never gets tired of eating either of them. It’s funny, because I rarely if ever make either one of them the same way twice.

Chili is just a naturally adaptable recipe. Over the years I've posted recipes for vegetarian white bean chili, a budget friendly chili with a mix of beanschipotle pork chili and most recently for bison black bean chili. The ingredients change all the time depending on my mood and what I have on hand.

But roasting a chicken is another story altogether. Like so many people I am always looking to improve how I make the perfect roast chicken. Mostly I spatchcock or butterfly it or roast pieces rather than a whole bird for more even and consistent results. But in this case, because Napa Grass Farmer had provided me with such a beautiful bird I thought I’d roast the whole thing.  I used Meyer lemons, but you could subsititute conventional lemons if you like and I’m sure it would still be good.  I learned the formula of roasting at 400 degrees for 15 minutes per pound, plus 10 minutes from Nigella Lawson who in turn credits her mother. It’s a great rule of thumb, especially for smaller birds.

Roasted Lemon Herb Chicken
Serves 4-6, depending on the size of the chicken

Ingredients

1 whole chicken
Kosher salt or flaky sea salt
2 Tablespoons olive oil
1 Tablespoon minced fresh rosemary
1 Tablespoon minced fresh thyme
1/4 teaspoon freshly ground pepper
Two Meyer lemons

Instructions

Measure 1/2 teaspoon salt per pound of chicken and place in a small bowl. Pat the chicken dry with paper towels. Set on a plate and sprinkle the chicken all over with the salt. Place the uncovered chicken in the refrigerator and allow to air dry for at least 2 hours and up to overnight. Remove the chicken from the fridge and pat dry, removing any visible moisture. Preheat oven to 400F. Leave the bird out of the fridge while you prepare the rub.

Zest the lemons, reserve the lemons and combine the zest with the olive oil, rosemary, thyme and pepper in a small bowl.  Cut the zested lemons into quarters. Place the chicken on a rack in a roasting pan and squeeze one lemon quarter inside the chicken, removing any seeds and place the remaining pieces in the roasting pan. Spread the herb mixture all over the bird.

Roast for 15 minutes per pound plus 10 minutes (or plus 20 minutes if the bird is 5 pounds or over). Rotate the chicken once or twice during roasting and cover lightly with foil if necessary to prevent over browning. The juices should run clear when you cut between the leg and the thigh and the temperature in the thickest part of the thigh should reach 165°F when pierced with an instant read thermometer. Allow to rest for about  15 minutes before carving.

Enjoy!

Disclaimer: My thanks to Napa Grass Farmer for providing me with the chicken. I was not compensated monetarily for this or any other Cooking with Amy post.
It’s always fun to try out new cooking tools. While I don’t have room for much in my apartment kitchen,  I’ve put these small and affordable items to the test.

First up, the Uten 2-3 cup mini chopper. It has 3 blades and was terrific for a few cloves of garlic and fantastic for chopping olives and a handful of nuts, although I didn’t love it for chopping an onion, that's something I'd rather do by hand anyway. But the real reason I love this chopper? It’s fun to use! Instead of being plugged in or attaching to another kitchen appliance like a stick blender, it works with a pull string. You can pull the string as many or as few times as you like to get the result you want. If you have kids I bet they would love using it too. It's dishwasher safe and currently on sale for just $8.99. To learn more about Uten products, sales and more, visit and "like" their Facebook page.


I use my toaster oven for most of my baking. I always line my baking trays with parchment paper, foil or a silpat. But I recently discovered the Cookina parchminum sheet. Unlike parchment you can use it when broiling or baking up to 550 degrees. Unlike parchment, it won’t burn. Unlike foil, it’s easy to clean and reuse. Unlike a silpat, it won’t stain. One sheet is supposed to last as long as 25 sheets of parchment but I suspect it will last even longer. It’s amazingly durable. While you can serve off of it directly I haven’t really used it that way. I’ve used it to bake cookies, roast vegetables and cook fish. It's a less wasteful, more environmentally friendly solution, it rolls flat for storage, and is PFOA free. Suggested retail price is $9.99.
I have plenty of knives, the last thing I need is another one. BUT I was really impressed with the Crisp paring knife because it has a cover that doubles as a sharpener. This is just so smart. Paring knives get used a lot but they don’t get sharpened as often as they should. This inexpensive knife which retails for $9.99 is perfect for camping or traveling. It’s a really smart innovation. The handle is comfortable and has a rubber inset where you grip the knife which makes it very ergonomic. It’s handy to have a couple knives with covers to use when you’re away from home. Crisp also offers a small serrated and bird’s beak paring knives.


GIVEAWAY! 

Uten is offering one mini chopper, Cookinga is offering one sheet and Crisp is offering one paring knife to a lucky reader. Leave a comment telling me which you’d prefer, the chopper, cooking sheet or the paring knife. Only one entry per person and you must have a US mailing address to be eligible to win. Contest ends on Friday May 6. 2016.

Disclaimer: My thanks to the manufacturers and retailers offering these products I was not compensated monetarily for this or any other posts on Cooking with Amy. 

I enjoy Greek yogurt and have been eating a lot of it lately. But I’ve also been cutting back on sugar. While fruit, granola, jam or honey are classic toppings for yogurt, I’ve been wanting to take yogurt in another direction. Since I tend to favor savory breaktasts rather than sweet ones I decided to try some savory Greek yogurt toppings, something I've seen around the web recently. 

I brainstormed some ideas and was inspired by flavors from Korea, the Mediterranean, Scandinavia and Morocco--and everything I tried turned out really well. I imagine that the variations are really endless, I just stopped at four. That said, a little flaky salt really helps to marry the flavors. Use kosher salt or your favorite flaky sea salt for added crunch. While I choose to eat these for breakfast, they are also very good as an afternoon snack or as part of a light lunch. I recommend using 1/2 cup of yogurt as the base, but you could use more if you prefer. Greek yogurt is thicker than regular yogurt so it holds the toppings particularly well. I use 2% but any Greek yogurt should be fine so you use whichever you prefer. I also suggest not serving the yogurt straight from the fridge, but letting it warm up slightly and approach room temperature. 

The recipes I’ve created are really just guidelines, try one out and then experiment! Consider shredded raw or roasted vegetables, nuts or seeds and any favorite condiments to be fair game. I'm thinking raw or cooked beets, thinly sliced celery, cooked greens and roasted winter squash would all be tasty with yogurt. If you come up with your own variation, please do leave a comment and share it. 

Yogurt with Kimchi & Sesame 
1/2 cup Greek yogurt
1 Tablespoon roughly chopped kimchi, mild or spicy
1/4 teaspoon toasted sesame oil
1/4 teaspoon sesame seeds
Flaky salt

Top the yogurt with the kimchi, drizzle with sesame oil, sprinkle with sesame seeds and a pinch of salt. 

Yogurt with Peppers, Olives & Capers
1/2 cup Greek yogurt
2 sliced peppadew or roasted peppers
4 sliced kalamata olives (or other olive of your choosing)
1/4 teaspoon capers
1/2 teaspoon extra virgin olive oil

Place the peppers, olives and capers on top of the yogurt. Drizzle with olive oil.

Yogurt with Carrot Salad
1/2 cup Greek yogurt
2 Tablespoons shredded carrots
1/4 teaspoon harissa 
1/2 teaspoon extra virgin olive oil
1 slice or wedge lemon
Flaky salt

Mix the carrots, harissa and olive oil and spoon onto the yogurt. Top with a squeeze of lemon and pinch of salt.  

Yogurt with Cucumber, Radish & Dill
1/2 cup Greek yogurt
1 Tablespoon diced cucumber
1 Tablespoon diced radish 
1/4 teaspoon minced fresh dill 
Flaky salt
1/2 teaspoon extra virgin olive oil 

Top the yogurt with the cucumber and radish. Sprinkle with dill, a pinch of flaky salt and finish with a drizzle of olive oil.

Enjoy!
A current food trend is the emergence of exotic superfood ingredients such as elderberry, aronia, haskap and moringa. Moringa is a plant native to South Asia and grown throughout the tropics. It's considered a superfood because the powdered leaves provide protein, calcium, iron, Vitamin A and Vitamin C. Peace Corps volunteer Lisa Curtis discovered it when she was living in West Africa and suffering from malnutrition. Now back in the US, she is the founder of Kuli Kuli Foods, a company that sells moringa based product in the US and helps to improve the lives of women like the ones she worked with, in Africa.

When I met Lisa I was inspired by her story and also curious to try experimenting with moringa, which comes in a powdered form, looking a bit like matcha but tasting more herbal with a slight bitter but not unpleasant edge. Aside from adding it to smoothies or using it bars, I thought it might be good in a chia pudding. 

Lots of chia pudding recipes use coconut or almond milk in addition to yogurt. I'm not really sure why! I used both whole milk and full fat Greek yogurt for this little verrine but you can use any milk you like. It makes a healthy and yet indulgent snack or light breakfast. The bitterness of the moringa is offset by a tiny bit of honey and the fresh raspberries. 

Moringa Chia Pudding with Raspberry
Makes 4 servings 

Ingredients 

1/2 cup milk
4 teaspoons honey
2 cups Greek yogurt
2 Tablespoons chia seeds 
1 Tablespoon moringa powder
1/2 cup raspberries
1/2 teaspoon honey
2 teaspoons chia seeds 

Instructions

Gently heat the milk and honey in a small bowl in the microwave or in a saucepan just until the honey disolves. Whisk together the milk and honey mixture, Greek yogurt, chia seeds and morinaga in a bowl then transfer to a container, cover and refrigerate for at least 4 hours but preferably overnight. 

Mash together the raspberries, honey and chia seeds and place in small container, cover and refrigerate. 

Portion the pudding into 4 verrines, cups or ramekins and top each with a spoonful of raspberrry sauce. 

Enjoy! 

Disclaimer: I was provided with samples of moringa to use in this recipe. I was not compensated monetarily for this or any other post on this blog. 
Bread Machine Buttermilk Wheat Bread Recipe
Recently I’ve gotten back into baking bread. First I tested a bread recipe using Einkorn flour in anticipation of reviewing an Einkorn cookbook. And when my friend Jerry James Stone asked if I would contribute a recipe to his Three Loaves project, I couldn’t say no. 

Three Loaves is a project where participants make three loaves of bread, one for themselves, another for a friend and a third for someone in need, every month. After signing up, each month you receive a new recipe to try. Since my recipe uses a bread machine, you won’t be baking all three loaves at once, but the concept is the same—bake and share. 

My baking supplies were rather low and I didn’t have any bread flour in the house so I decided to look for a recipe I could make in my mini Zojirushi bread machine (it makes one pound loaves) that used all purpose flour. I found the basic recipe on the King Arthur Flour website for Sandwich Bread for the Mini Zo Bread Machine. The comments on this recipe were very encouraging. Commenters had good success with the recipe using different bread machines, and with adapting it, which is exactly what I did. I used ingredients I had on hand—namely honey, buttermilk and white whole wheat flour. 

I’m sharing my version which makes a light whole wheat loaf, but if you want to make some changes, feel free! The original recipe is very forgiving. If you want to make a larger loaf, you could certainly double the recipe. It makes very good toast and is perfect for sandwiches. 


Makes a one pound loaf

Ingredients 

2/3 cup hot water
1/4 cup cold buttermilk
2 Tablespoons olive oil 
1 1/2 cups white whole wheat flour 
1 cup unbleached all purpose flour
1 1/4 teaspoons salt
2 Tablespoons honey
1 teaspoon active dry yeast

Instructions
Place all ingredients into the pan of the bread machine in the order listed, and program the machine for a one pound loaf, Basic White Bread and press start. 

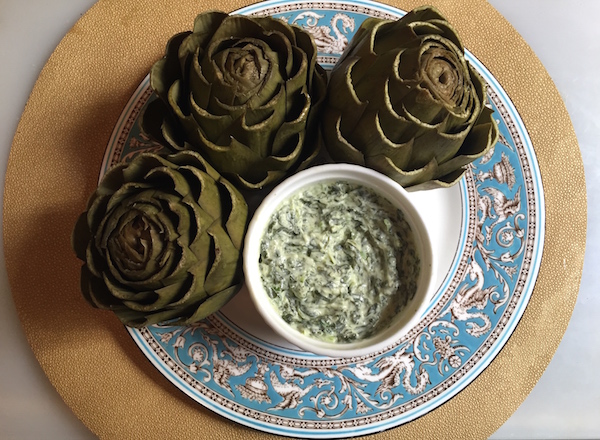
artichoke and creamy spinach dip

As a child I wasn’t crazy about vegetables with one notable exception. I loved artichokes. My mother served them with lemon butter or garlic mayonnaise and upon retrospect I think that was in no small part why I loved them so much. All other vegetables were served plain, but artichokes got the royal treatment, and frankly, what isn’t better with a dip in lemon butter or garlic mayonnaise?

creamy spinach dip
There’ s a popular dip with canned or frozen artichoke hearts. spinach and loaded with cheese and mayonnaise. I’ve remade the recipe, creating a creamy dip made with fresh spinach, herbs and Greek yogurt. Dip the artchoke leaves and heart into the dip and you get the flavor of that dip but in a much fresher, lighter and healthier way. 

Artichokes are good hot or cold and are a very good source of dietary fiber, vitamin c, vitamin k, folate and manganese and a good source of niacin, magnesium, phosphorus, potassium and copper. They do require a little prep work. You need a good pair of kitchen shears to trim the thorny tips off the leaves, I also remove a few of the tougher small leaves on the base of the artichoke and use a paring knife to trim the stem just so it will stand up during cooking. If you are only making one artichoke, you can easily prepare it in the microwave. Simply trim the artichoke and place it stem side up, along with 1/4 cup of water in a soup mug or cereal bowl. Cover with microwave safe plastic wrap and microwave for about 6 minutes. It’s that easy! 

If you’ve never cooked artichokes before, now would be a good time to start. Ocean Mist Farms is running the Artichoke Adventurer contest. Upload a picture or video of yourself cooking or eating a fresh artichoke – even if it’s your first time – for a chance to win a trip to Monterey, California for the 2016 Castroville Artichoke Food & Wine Festival June 4 - 5, 2016 for you and a friend. The grand prize will include a travel and lodging from June 3 – 6, 2016, admission to the Artichoke Festival, and $1,800 in gift cards to enjoy other experiences in Monterey, such as wine tasting, kayaking, museums and more. Your entry will be judged based on creativity of your photo or video, and how well you show off your adventurous spirit. 

See official rules for details and enter the contest at http://www.oceanmist.com/sweepstakes

artichoke with creamy spinach dip

Artichokes with Creamy Spinach Dip

4 servings

Ingredients 

4 fresh artichokes
10-12 ounces baby spinach
1/2  teaspoon garlic powder
1/4 teaspoon Kosher or sea salt
1/4 cup extra virgin olive oil
1/2 cup finely chopped green onions
1/4 cup finey chopped fresh dill, cilantro or combination
1 cup Greek yogurt, preferably 2%
Freshly ground pepper

Instructions 

Trim the  thorny tips of the artichokes and any small tough outer leaves at the base, If you have a pressure cooker, use a steamer basket and cook with a cup of water, under high pressure for 10 minutes. If you don’t have a pressure cooker, steam them for about 40 minutes, or untll the leaves can be plucked with a gentle tug. Let cool.

Bring a large pot of water to a boil. When the water comes to a boil, add the spinach and blanch for 10 to 20 seconds, just until wilted. Transfer to a bowl and run cool water over it until cool to the touch, then drain and squeeze very dry.

Finely chop the spinach or place the spinach in a food processor and pulse. Transfer to a bowl and mix in the garlic powder, salt, olive oil, green onions, herbs and yogurt. Season to taste with fresh pepper. Serve the artichokes with the dip. 

Enjoy! 


Disclaimer: I received artichokes from Ocean Mist Farms, I was not compensated monetarily for this or any other post.  
In my parent’s kitchen there was a hook near the door. It pretty much always had Columbus Italian dry salami hanging from it. It never occurred to me that this was not the case in every house in America. When I was growing up it was my sister who had the sweet tooth, not me. I loved all things savory. I remember asking my mother if people could choose to be vegetarian, could I be a carnivore? I didn’t hate vegetables, I just loved salty foods. I still do. Some of my favorite things when I was young were thick cut potato chips, corn chips, smoked salmon and salami. 

California style Italian dry salami was an integral part of my childhood. I ate fat slabs of salami and thin slices. I ate the crusty ends, peeling off the white dusty paper. I ate it in sandwiches for lunch and for dinner when it was too hot to cook. We used to sit at a picnic table in the Summer on the deck with a big plate of cherry tomatoes, slices of cheese and salami. Take what you want, my mother would say. To us, it wasn’t an antipasto platter but a “take plate.” 

When I had one of my first jobs, working at a gourmet retail shop, I’d head off to a nearby Italian deli for lunch most days. They refused to sell sandwiches but would sell meat sliced to order and rolls and throw in packets of mustard and mayo so you could make a sandwich yourself. Salami with or without mortadella was my fuel and my soul food. Years later when I lived in Italy I discovered many other styles of Italian cured meats and other ways of serving it—proscuitto with Tuscan bread, mortadella draped over warm gnocco frito and various kinds of salami flavored with black pepper or fennel or red chiles. 

Italian dry salami it turns out, is a Bay Area speciality. According to an article in the Los Angeles Times, around 1970, local Bay Area salami producers, descendants of salami makers from Milan, Lucca, Parma and Modena formed the Dry Salami Institute and were able to convince the US Department of Agriculture that Italian dry salami should be made according to certain standards and the name protected against inferior products. It is really Italian? That’s hard to say since it’s made in America and has a pungent scent and flavor profile particular to this area. It’s definitely a Californian style of Italian salami and although producers like Columbus make many different varieties such as Calbrese, peppered and sopressata, nothing reminds me of my childhood quite like an Italian dry salami, hanging from a hook.

Salami tips:

Slicing
Here’s a simple rule—for smaller chubs, cut thicker slices and for larger ones, cut thinner slices. This will allow for the best taste, texture and aroma. 

Storing 
Although shelf stable, after you cut into a salami, it’s best to store it in the refrigerator to prevent dehydration. Salami needs humidity, so keep it in a moist plastic bag (you can include a wet paper towel in a resealable bag if necessary). 

Serving 
Salami is often served on an antipasto platter, but consider adding it to a fruit and cheese plate. It pairs well with so many things—nuts, stone fruit, grapes, apples, pears, grilled vegetables and olives. Let salami come to room temperature before serving. 

Disclaimer: My thanks to Columbus for inspiring this post and providing samples. I was not compensated monetarily for this or any other post on Cooking with Amy. 

Summer is in full swing and so are the farmers markets. It’s a joy to walk around and see all the juicy peaches, luscious strawberries, plump eggplants, and many colors, shapes and sizes of peppers and squash. Much as I like Summer squash, I’m even more crazy about their younger selves—squash blossoms. They are wonderful stuffed and fried, in frittata, risotto, in quesadillas and of course, with pasta. 

I am a pasta maniac and swear I could eat a pound of it in one sitting. But I’ve been experimenting lately and I’ve found I can be satisfied with a whole lot less pasta if I add a lot of other ingredients. This recipe is a perfect example. It has plenty of vegetables and just a little pasta. It uses very few ingredients so use the absolute best you can get from either your garden or a farmers market. 

Squash blossoms are very delicate and I like this technique of just blanching them in the pasta water rather than sauteeing them. Many recipes use to many other strong flavored ingredients such as herbs, spices or other vegetables which I think is a mistake. Simpler is better to let the squash blossoms shine. This dish is my version of a recipe I found from Rocco DiSpirito. Mine is lighter and healthier and weighted more towards the vegetables than the pasta. I use whole grain pasta, but you certainly don’t have to if you prefer another kind. Note: Only use sweet and “squishy ripe” tomatoes. Yellow ones would be nice too instead of red.


Squash Blossom Pasta 
Serves 4

Ingredients

2 cups whole grain pasta such as rotini
1/4 cup extra-virgin or olio nuovo olive oil
2 cloves garlic, finely minced or smashed 
2 cups squished fresh juicy tomatoes
4 cups squash blossoms, stamens removed, and torn 
1⁄4 cup grated Parmigiano-Reggiano
Salt 

Instructions

Cook the pasta in a large pot of boiling, salted water.

Heat the oil in a large pan, add the garlic, and sauté over low heat until the garlic is soft and golden but not brown. Add the tomatoes, raise the heat and simmer for about 5 minutes, until very thick and saucy.

When the pasta is just barely al dente, add the squash blossoms to the pot, and stir. Scoop out the pasta and squash blossoms with a strainer and add to the pan with the tomatoes, adding a little of the cooking liquid. Continue cooking until the liquid has been absorbed and squash blossoms wilted. Off the heat season with Parmigiano-Reggiano and salt to taste.


Enjoy!


I don’t know when I stopped making salad every night, but it happened. That’s not to say I don’t eat salad anymore, I probably eat it more often than ever, I just eat it as a main dish instead. At least several times a week for lunch and at least once a week for dinner, I serve a main dish salad. What makes it a main dish? I’d say protein. And tofu is a perfect plant-based protein for salads. 

A few weeks ago I attended an event hosted by House Foods organic tofu. Chef Melissa King did the cooking and also a cooking demo. I picked up a lot of good ideas. I loved her take on a Caprese salad and I’ve made my own versions of it several times. In one version I made a small bite style appetizer by placing diced tomatoes and tofu on large basil leaves and dressed them with coarse salt and extra virgin olive oil. In another, I was captivated by another recipe I found for Tomato-Peach Salad with Tofu Cream. But I wanted the salad to be a main dish, rather than a starter so I made some changes. 

My version uses tofu in two ways, I used it as a creamy dressing and also in pieces. It’s a very light summery salad, perfect for lunch. The soft tofu is really nice with the juicy peaches and tomatoes. I shouldn’t have to say it, but this recipe relies on the best quality lucious and sweet produce. If nectarines taste better than peaches, by all means use them instead. The fresh basil, salt and pepper provide a nice balance to the sweetness of the the fruit. 

Tomato Peach Tofu Salad
Serves 4

Ingredients

14 ounce package silken tofu
1 Tablespoon sherry vinegar
2 1/2 teaspoons soy sauce
2 large heirloom tomatoes
2 large peaches
1 bunch fresh basil, about 20 leaves
4 teaspoons extra virgin olive oil
Coarse salt and freshly ground pepper

Instructions

Cut the tofu into two halves. Place one piece in the blender with the sherry vinegar and soy sauce and blend until creamy. Taste for seasoning. 

Take the other half of the tofu and slice it into about 20 pieces. Slice the tomatoes and peaches into thin wedges. 

Spoon the creamy sauce into four plates top with slices of tomatoes, peaches, tofu and basil leaves. Drizzle each plate with a teaspoon of olive oil and finish with a generous pinch of salt and black pepper to taste. 

Enijoy!  


Disclamer: My thanks to Washington State Fruit Commission for the peaches and House Foods for the tofu.  
With Summer comes sweet juicy stone fruit like peaches and nectarines. Which is exactly what was in the second batch of fruit I received as part of the Canbassador program from SweetPreservation.com.  In addition to making a cobbler and a tomato peach salad, I made peach ginger butter. Fruit butter is very similar to jam, but it has a creamy consistency that seems amost buttery even though it’s completely dairy free. Fruit butters are easier to make than jam since they don’t set the same way. You cook the fruit to the right texture rather than setting with pectin. 

Since this was my first time making it, I had lots to learn. For one thing, you don’t need to remove the skins. I did, but this was not necessary since they get pureed into the mixture. I added some vanilla, cinnamon and cloves in a sachet. This was also probably unnecessary. Because of the ginger flavor you can’t really detect the other spices. I used mostly all peaches and one nectarine. 

The main thing I learned about making fruit butter is, it’s really easy to make! It takes very little time or effort and makes a jar makes a nice gift. The recipe I used came from The All New Ball Book of Canning and Preserving

I like fruit butter on an English muffin, but it’s good on any sweet breakfast bread or toast. The silky consistency is really irresistable! I’ve put together a list of ways to use it.  Have you made or used fruit butters? If so, let me know how you like to use them.

Ways to use peach butter 

* Add to a cheese or charcuterie plate

* Use as a filling for cookies or pastries 

* Layer on a grilled cheese sandwich

* Mixed with mustard as a marinade or sauce

* Used in place of apple butter in cakes or muffin recipes

* Serve on crepes, pancakes or waffles 

* Swirl into yogurt  

* Mix it with ketchup and soy sauce to make a barbecue sauce

* Slather on biscuits, cornbread, muffins or croissants

Disclaimer: My thanks to the Washington State Fruit Commission for choosing me as a Canbassador and providing me with fruit and to Jarden for providing a copy of the book.